
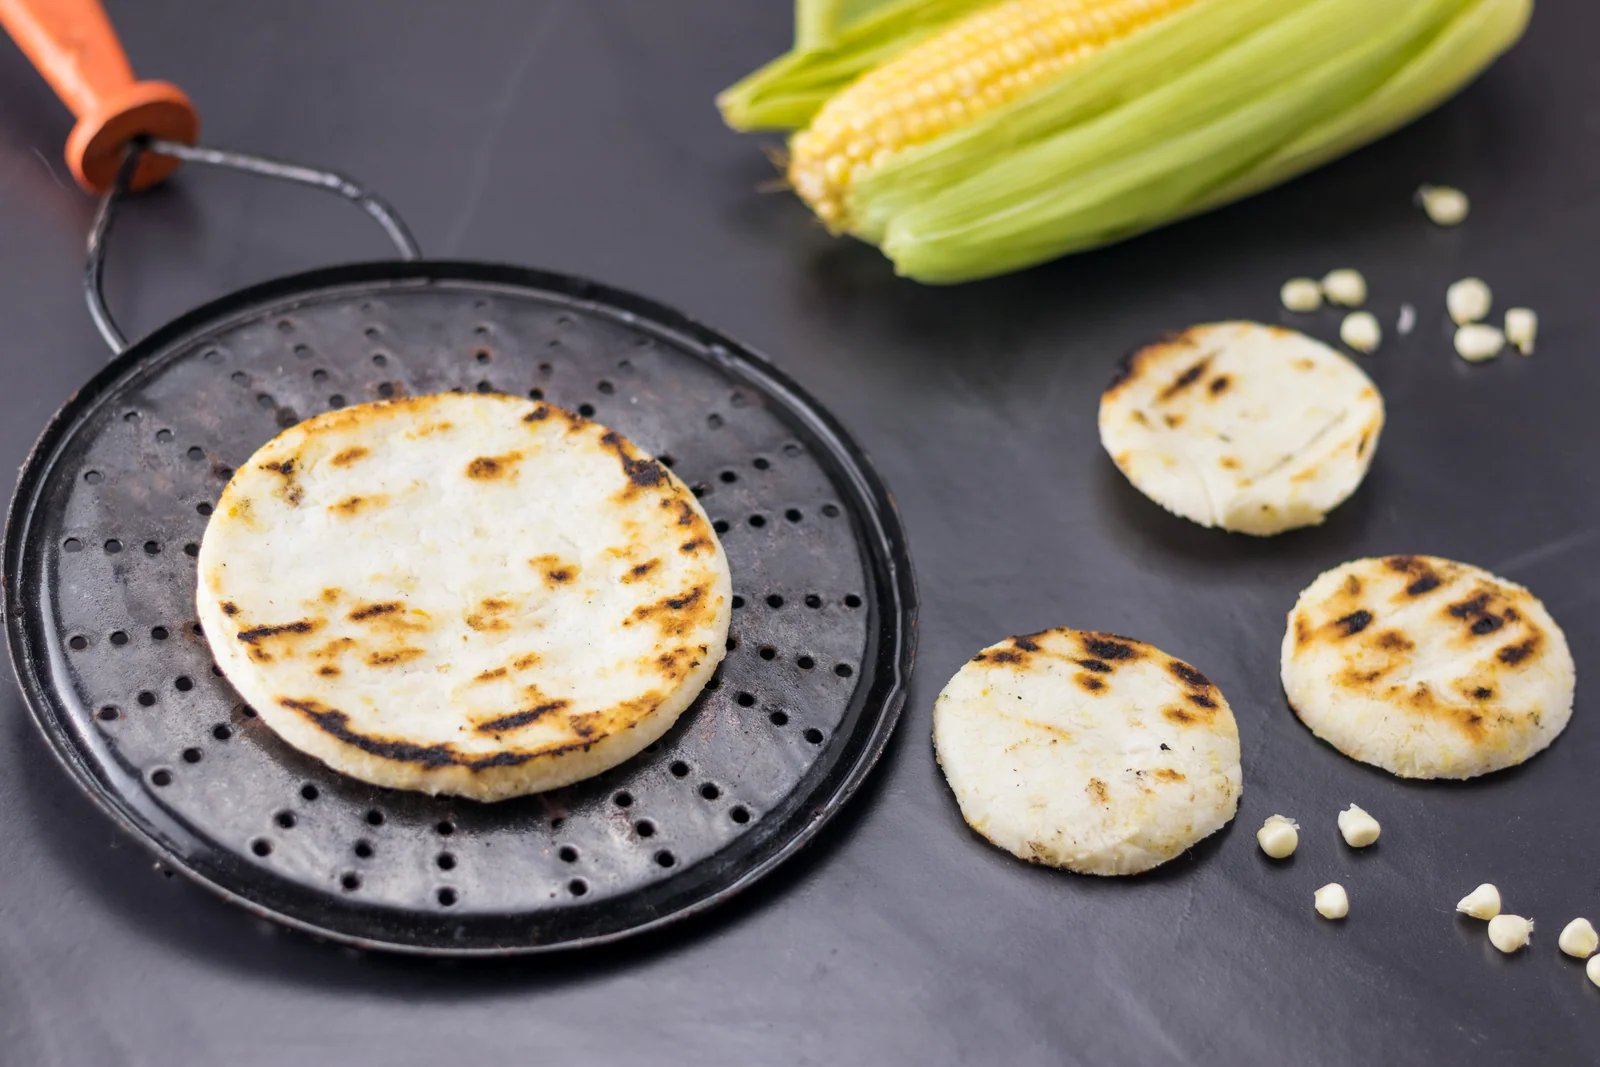
If you have eaten breakfast in Medellín, you have met this arepa: a thin, plain disc of white corn, about ¼ inch (6 mm) thick, with brown spots from a dry griddle and a pat of butter melting on top. In Colombia it is called the arepa paisa, after the people of Antioquia, and it works the way a slice of toast does. You don’t split it or stuff it. You spread it, top it, or eat it alongside eggs and beans. It takes three ingredients, one of which is easy to get wrong in a US or UK store, so that comes first.
What is arepa paisa?
How do you make arepa paisa? Mix 300 g (about 2 cups) of white pre-cooked corn flour into 420 ml (1¾ cups) of warm salted water, knead for 2 to 3 minutes and rest 5. Shape 8 balls of 90 g (3 oz), press each between plastic into a 5 in (13 cm) disc about ¼ in (6 mm) thick, and cook in a dry skillet over medium heat for 4 to 5 minutes a side. 45 minutes for 8 servings.
An arepa (ah-REH-pah) is a corn cake from Colombia and Venezuela, and each region has its own. The paisa one, from Antioquia and the Coffee Region, is white, thin, unfilled and made with little or no salt, because the butter and cheese on top supply it. The thinnest version, rolled out to about ⅛ inch, is called arepa tela, roughly “cloth arepa”.
Here is how it compares with the other arepas on this site:
| Arepa | Thickness | Dough | How you eat it |
|---|---|---|---|
| Arepa paisa | about ¼ in (6 mm) | white corn flour, water, a pinch of salt | topped with butter and cheese |
| Venezuelan arepa | about ¾ in (2 cm) | corn flour, water, salt | split open and stuffed |
| Colombian cheese arepas | about ½ in (1.5 cm) | cheese in the dough | split and filled with melting cheese |
| Boyacá arepas | thick | sweetened, with curd cheese inside | as a sweet-and-salty snack |
The flour, and what happens if you buy the wrong one
You need pre-cooked corn flour, sold as masarepa or harina de maíz precocida. The corn has been cooked, dried and milled, which is why it turns into a dough with nothing but warm water. For arepa paisa, buy white.
- In the US → P.A.N. white and Goya Masarepa are in the Latin aisle of most large supermarkets and online. The P.A.N. bag says “pre-cooked white corn meal”. Despite the words “corn meal”, that is the right product.
- In the UK → Latin American grocers and online shops sell P.A.N. in 1 kg bags.
The three mix-ups, and what each does to the arepa:
- Masa harina (Maseca and similar) is corn treated with lime for homemade corn tortillas. It makes a dough, but the arepa cracks more as you press it and tastes like a tortilla.
- Cornmeal or polenta is raw ground corn. With warm water it never comes together into a dough, and the arepas fall apart in the pan.
- Yellow pre-cooked flour works perfectly well, with the same water. You get a golden arepa with a stronger corn flavor; it just isn’t the white arepa paisa.
Ingredients for 8 arepas
| Ingredient | Metric | US | Notes |
|---|---|---|---|
| White pre-cooked corn flour | 300 g | 10½ oz, about 2 cups | Weigh it if you can; cup measures vary |
| Warm water, 40°C (104°F) | 420 ml + 60 ml reserve | 1¾ cups + 4 tbsp | Comfortable to hold a finger in |
| Fine salt | 3 g | ½ tsp | Optional; leave it out for arepa tela |
| Butter and fresh cheese | to serve | to serve | Queso fresco works; see below |
Equipment. A heavy 12-inch (30 cm) skillet, cast iron or thick nonstick, or a flat griddle; a zip-top or produce bag cut open along the sides; a flat plate or cutting board to press with. A tortilla press does the same job and makes every arepa identical. A thin aluminum pan scorches the outside before the inside is cooked.
How to make arepa paisa, step by step
Get the dough right
Salt into the water first, flour second, in a steady stream while you mix with your hand. Knead for 2 to 3 minutes, then cover and rest it 5 minutes while a 12-inch pan heats: the flour keeps drinking water, and dough that felt soft firms up during the rest.
I use 1.4 ml of water per gram of flour, which is 420 ml for 300 g. A thin arepa needs a softer dough than a thick one, because the edge splits as you press it if the dough is short on water. The cup measures printed on the bag make an even wetter dough, which also works between sheets of plastic.
The one test. Flatten a small ball between your palms. Cracked edge: add 1 tbsp of water, knead, test again. Sticking to your hands: add 1 tbsp of flour. Right: soft play dough, smooth edge.
Press them thin between plastic
By hand, a ¼-inch arepa tears or ends up thinner in the middle than at the edge. Plastic fixes both.
- Cut a zip-top or produce bag along both sides so it opens into a double sheet.
- Put a 90 g (3 oz) ball in the middle, fold the top sheet over and press down evenly with a flat plate until the disc is 5 in (13 cm) wide and about ¼ in (6 mm) thick.
- For a neat round, trim around a 5-inch bowl or ring through the plastic.
- Peel off the top sheet, flip the arepa onto your palm and peel off the other. Pinch any cracks closed with a damp finger.
For arepa tela, press the same ball to about ⅛ in (3 mm). At 3 mm it cooks in 2 to 3 minutes a side and burns quickly, so stay with it.
Cook them dry, and know when they’re done
Medium heat, no oil, pan preheated 3 to 4 minutes. On cast iron that isn’t well seasoned, wipe it with a paper towel and a few drops of oil. Any more than that and you fry the arepa instead of toasting it.
- First side, 4 to 5 minutes, untouched. Move it early and it sticks and tears. It’s ready to flip when it slides when you shake the pan and has golden patches.
- Second side, another 4 to 5 minutes, 8 to 10 in total. Some will puff a little.
- Done when both faces have a dry crust with toasted spots and the center feels firm under your finger. If it gives and feels damp, turn the heat down and give it 1 more minute a side.
On a gas stove, many Colombian homes finish arepas on a wire rack over the flame, 2 to 3 minutes a side over medium heat, watching constantly. It works best with arepas that have already set for 2 minutes a side in the pan.
Why arepas crack, stick or stay raw
- Cracking when pressed → not enough water, or no rest. Add water a tablespoon at a time and give it the 5 minutes.
- Sticking to the plastic → too much water. Work in a tablespoon of flour, or wipe the plastic with a damp finger.
- Sticking to the pan → the pan was cold, or you moved them too soon.
- Burnt outside, raw inside → heat too high. Medium heat, 4 to 5 minutes a side.
- Hard as a cracker → cooked too long over low heat until they dried out.
- Tastes like a tortilla → that was masa harina.
Making arepa paisa from dried corn
Before bagged flour, Antioquia made its arepas from maíz blanco trillado, dried white corn with the hull removed, soaked, boiled, ground and kneaded. The arepas taste more of corn and the crumb is a bit denser. For about 12 arepas of 90 g (3 oz):
- Soak 500 g (1 lb 2 oz) of white trillado corn in plenty of water for 8 to 12 hours. Drain.
- Boil in 3 liters (about 3 quarts) of water over medium heat, lid ajar, for 1 to 2 hours. Start tasting at 50 minutes. You want the middle point: the kernel breaks between your teeth and is tender outside, but the center still has a little bite and the kernel hasn’t burst. A pressure cooker is much faster; check a kernel the first time you release the pressure.
- Drain and cool until you can handle it, about 30 minutes.
- Grind twice through a hand mill on its finest setting, or in batches in a food processor with 2 to 3 tbsp (30 to 45 ml) of water if it jams.
- Knead with ½ tsp (3 g) salt, if using, for 4 to 5 minutes until smooth and crack-free, then shape and cook exactly as above.
Overcooked corn makes a sticky, gummy dough; kneading in 2 to 3 tbsp (about 20 to 30 g) of pre-cooked flour rescues it partly. Undercooked corn makes a sandy dough that crumbles, so boil it longer before grinding, not after.
Where to find the corn. Look for bags labeled maíz blanco trillado or maíz para arepas at Colombian grocers in the US and UK. US dried hominy and Mexican pozole corn are not the same: they are treated with lime, and the arepa comes out tasting of tortilla. Unlike pre-cooked flour dough, which takes 8 minutes to make, trillado dough is worth keeping: it lasts 2 days in the fridge with plastic pressed onto the surface.
What to eat with arepa paisa
- Butter and salt, the everyday version, or butter and quesito, the soft, fresh Antioquian cheese crumbled on top. In the US, queso fresco is the closest match; in the UK, a mild fresh cheese such as well-drained ricotta is nearer than anything aged.
- Eggs. Next to Colombian scrambled eggs with scallions and tomato, or with a fried egg on top.
- Pork crackling. Broken over the arepa, or a piece of Colombian chicharrón on the side.
- As the bread of the meal. It sits on every bandeja paisa platter, next to beans, rice and meat.
- With a hot drink. Colombian hot chocolate with cheese, or coffee with milk.
How many. I count 2 per adult at breakfast and 1 alongside a main meal. For 16, double the dough and run two skillets. The flour is the cheap part; the cheese and butter are where the money goes.
Diet notes. No heat at all. Made from pure corn flour it is gluten-free, though it’s worth checking the label for wheat warnings. Without the butter and cheese it is dairy-free and vegan.
Storing and reheating
- Fridge → cooked and cooled, in a sealed bag, up to 3 days. At room temperature, overnight at most.
- Freezer → cooked and cooled, with parchment between them, up to 1 month. Reheat from frozen.
- Reheat → in a dry skillet over medium heat, 2 to 3 minutes a side from the fridge, or about 5 minutes a side over medium-low from frozen. A toaster or a rack over a gas flame also brings the crust back. The microwave makes them leathery.
- Raw shaped arepas → don’t keep them. Pre-cooked flour dough cracks and dries out in the fridge, so shape only what you’ll cook.
Frequently asked questions
Is arepa paisa the same as a Venezuelan arepa? No. The Venezuelan arepa is about ¾ inch thick, finished in the oven and split to stuff. Arepa paisa is about ¼ inch, white, unfilled and eaten with toppings.
Why is arepa paisa made without salt? It’s eaten with salted butter, salty fresh cheese or alongside seasoned food. If you find it bland on its own, ½ tsp of salt for 8 arepas is enough.
Can I use masa harina or cornmeal instead of masarepa? Not for this. Masa harina gives a crackly arepa that tastes like a tortilla, and cornmeal won’t hold together.
How many calories are in an arepa paisa? About 139 kcal for a plain 90 g (3 oz) arepa, and about 300 with 10 g of butter and 30 g of fresh cheese.
Nutrition
Per plain arepa (90 g / 3 oz of dough), made with pre-cooked flour and ½ tsp salt shared across 8:
- Calories: 139 kcal
- Protein: 3 g
- Carbohydrates: 30 g
- Fat: 1 g
- Fiber: 1 g
- Sugars: 1 g
- Sodium: 148 mg (about 3 mg without the salt)
With 10 g (2 tsp) of salted butter and 30 g (1 oz) of queso fresco on top, it comes to about 300 kcal and 440 mg sodium.
I grew up in Venezuela with thick arepas packed with filling, and the first thin, plain paisa arepa I was served in Colombia looked unfinished to me. It took a few breakfasts to see the point: here the arepa is the plate and the butter and cheese are the seasoning. Now I press them between plastic most weeks, and they disappear before the cheese does. Josnaisis.