
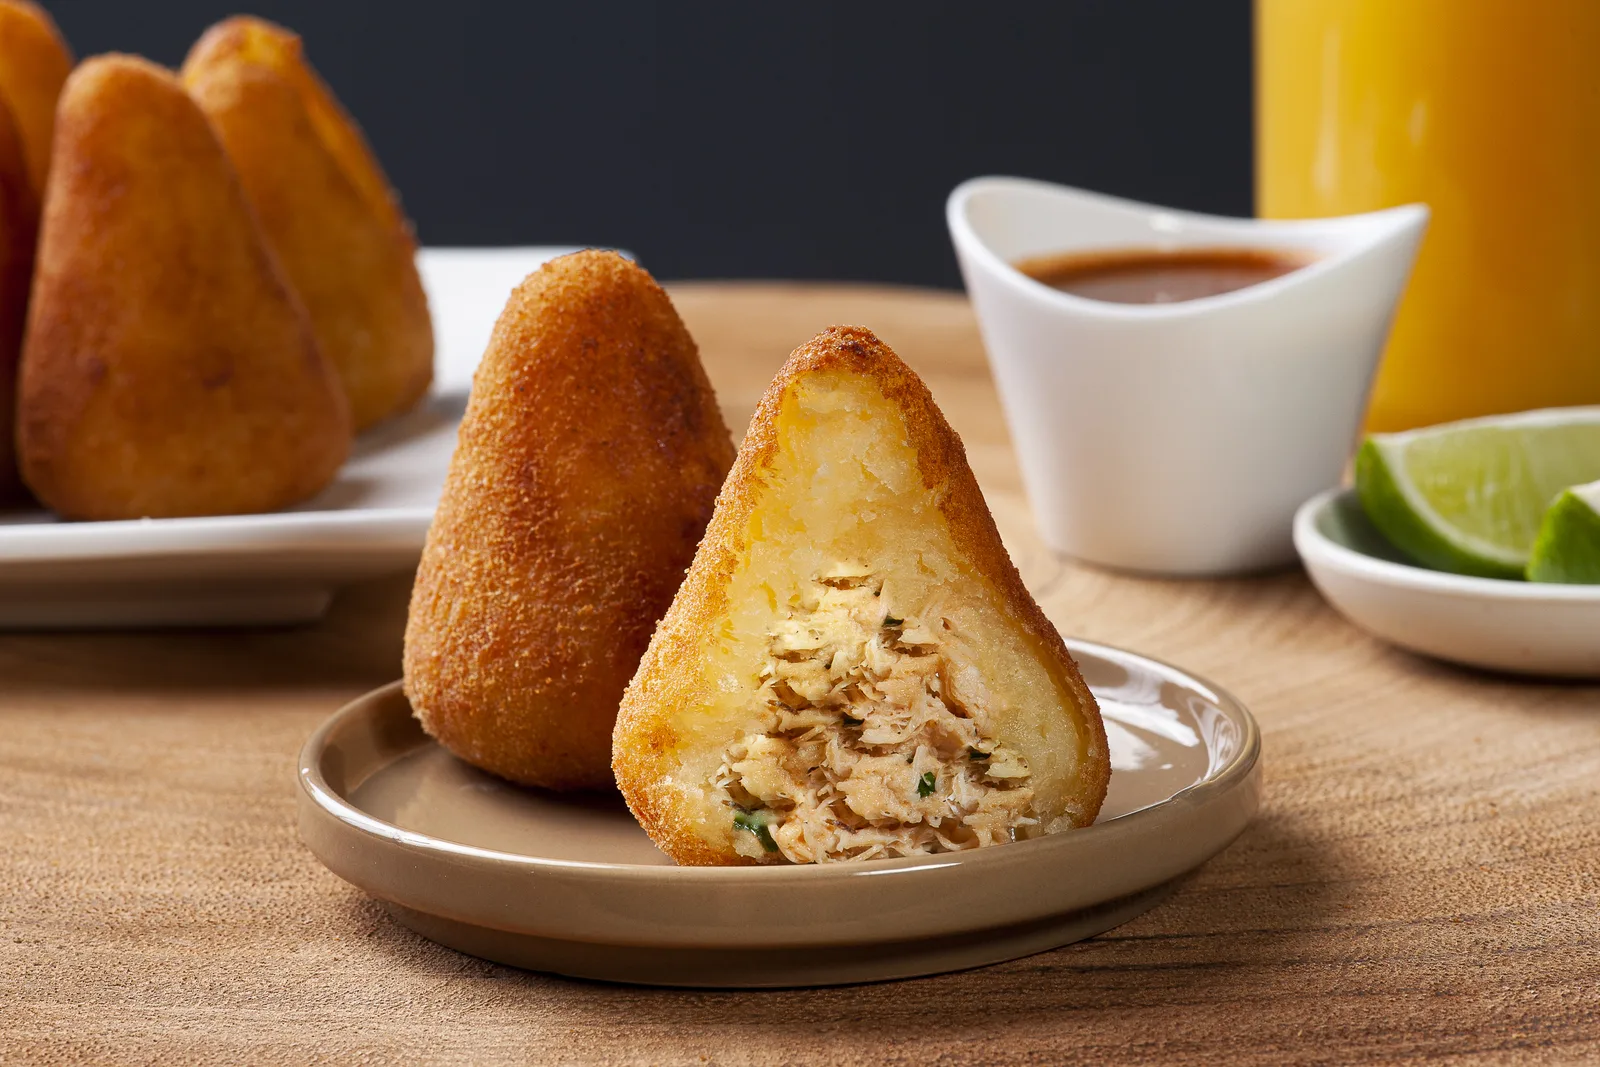
Coxinha (koh-SHEE-nyah) is Brazil’s chicken croquette, shaped like a teardrop or a little drumstick, which is what the name means in Portuguese. What surprises most people is the dough: it isn’t mashed potato or a béchamel but the broth the chicken was poached in, brought to a boil and thickened with flour until it turns into a smooth, savory paste. You wrap it around creamy shredded chicken, coat it in breadcrumbs and fry it. This recipe makes 24 medium coxinhas and walks you through the part that decides everything, getting that dough to the right point.
What coxinha is, and what you’re signing up for
How do you make Brazilian coxinha? Poach 1⅓ lb (600 g) of chicken, shred it and mix it with a quick sofrito and requeijão or cream cheese. Boil 3 cups plus 2 tbsp (750 ml) of the broth with 2 tbsp butter, add 3 cups (375 g) flour all at once and stir until the dough leaves the sides of the pot. Wrap the filling in 1½ oz (45 g) balls of dough, shape into drumsticks, bread them and fry at 350°F (180°C). 150 minutes for 24 coxinhas, or 12 servings of two.
In Brazil coxinha is one of the standard salgados, the savory bites sold in bakeries and snack bars and eaten at any time of day. Think of it as a cousin of the croquette: crunchy outside, a soft and slightly chewy layer of dough, and a moist chicken center.
Two and a half hours start to finish, which includes cooling the filling and resting the dough. Medium difficulty: no step is hard, but shaping 24 takes patience, and your first few will look rougher than your last.
Ingredients and US and UK swaps
| Ingredient | Metric | US | Notes |
|---|---|---|---|
| Chicken breast or thighs | 600 g | 1⅓ lb | Thighs give a juicier filling |
| Broth from poaching | 750 ml + 60 ml | 3 cups + 2 tbsp, plus ¼ cup | This is the dough’s flavor, so season it well |
| All-purpose flour | 375 g | 3 cups | UK plain flour. Not self-rising |
| Butter | 30 g | 2 tbsp | |
| Requeijão or cream cheese | 150 g | 5 oz | See below |
| Fine dry breadcrumbs | 200 g | about 2 cups | Panko gives a thicker, craggier shell |
| Oil for frying | 1.5 liters | 6⅓ cups | Canola, vegetable or peanut |
Catupiry, requeijão and what to use instead
Requeijão is a soft, spoonable Brazilian cheese spread, looser and milder than cream cheese; Catupiry is the best-known brand. In the US it’s sold mainly through Brazilian grocers and online, and you won’t usually find it in a regular supermarket. In the UK, try Brazilian grocers or online sellers. Don’t confuse it with ricotta-style requesón: that’s grainy and leaves the filling dry.
| Instead of 5 oz (150 g) requeijão | What changes |
|---|---|
| Full-fat cream cheese (Philadelphia) | Firmer and tangier. Stir it into the filling while it’s still warm so it spreads evenly |
| Cream cheese loosened with 1 to 2 tbsp milk | Closest to requeijão’s texture |
| 3 tbsp mayonnaise | Looser filling with no cheesy note |
| Nothing | Works, but the filling is drier: add 2 to 3 tbsp more broth while it cooks |
Store-bought broth. If you use a rotisserie chicken (about 1 lb / 450 g of meat, skin removed), make the dough with low-sodium carton broth or stock and taste before salting. Full-salt cubes and cartons make a noticeably saltier dough.
Equipment. A wide, heavy pot for the dough (a small one leaves no room to stir hard), a sturdy wooden spoon, a deep pot for frying and a deep-fry or instant-read thermometer if you have one.
Making the dough, the ratio and how to tell it’s done
The ratio is twice as much broth as flour, by weight, so 750 ml to 375 g. It’s a firm dough, which is the easiest to shape. Wetter versions exist and come out more tender, but they stick to your hands.
Two things matter: the broth and its 2 tbsp of butter must be at a full boil, and the flour goes in all at once, before you stir hard over medium-low heat for 3 to 5 minutes. It starts out like lumpy wallpaper paste; keep pressing the lumps against the pot. It’s ready when:
- it’s one heavy ball that comes away from the bottom and sides,
- a thin film of dough is left stuck to the bottom of the pot,
- it doesn’t stick when you touch it with the back of a spoon or a fingertip.
Stop early and the flour is undercooked: sticky, pasty-tasting dough that cracks in the oil. Knead it while warm until smooth and a little springy, and keep it under plastic wrap so it doesn’t form a skin. For the yellowish color some bakeries have, add ¼ tsp turmeric or ground annatto to the broth.
Shaping the drumstick, step by step
Shape while the dough is warm: cold dough cracks and hot dough sticks.
- Roll a 1½ oz (45 g) ball and press it into a 3½ to 4 in (9 to 10 cm) disc in your palm, leaving the center thicker. That becomes the base, which carries the most weight.
- Cup your hand and add a heaped tablespoon of cold filling.
- Bring the edges up like a pouch, pressing gently so no air is trapped between dough and filling, and pinch closed.
- Twist the top between thumb and forefinger to make the point.
- Tap the base on the counter so it stands upright.
A light film of oil on your hands stops sticking. Cracks get sealed with a damp fingertip before breading, every time.
Cheese-centered version. For coxinha com Catupiry, leave the cheese out of the filling and drop 1 tsp requeijão or cream cheese on top of the chicken in each one before closing.
Breading and frying at 350°F (180°C)
Egg and milk first, then breadcrumbs, pressed on with your hands. For a thicker shell, dip in egg and crumbs a second time.
Fry at 350°F (180°C) with at least 2 in (5 cm) of oil, 4 or 5 at a time. The filling is already cooked, so you’re only browning the crust and heating the center: 3 to 5 minutes for 45 g (1½ oz) coxinhas, turning. Crowd the pot and the oil drops below 340°F (170°C), and they come out greasy and soft. Above 375°F (190°C) they brown before the middle heats through.
Keeping them warm. On a rack in a 250°F (120°C) oven while you fry the rest.
Why coxinhas burst, and other fixes
- Splits or bursts in the oil. An unsealed crack, air trapped when closing, filling that’s wet or warm, or too long in the oil. Seal, press out air, cook the filling dry, and lift them out as soon as they’re golden.
- Dough too sticky to shape. It wasn’t cooked long enough. Put it back over the heat for 1 to 2 minutes, stirring, or knead in 1 to 2 tbsp flour.
- Dough cracks as you shape. It cooled too much or dried out uncovered. Knead with slightly damp hands and keep it covered.
- Greasy and soft. The oil was too cool or the batch too big. Let it come back to 350°F (180°C) between batches.
- Brown outside, cold inside. Oil too hot, or very large coxinhas. Turn it down to about 345°F (175°C).
- Bland dough. The broth was under-seasoned. Taste it before the flour goes in.
Allergens. Contains wheat/gluten (flour and breadcrumbs), egg and dairy (butter, milk, cheese). Not spicy, and kids usually love them.
Make ahead, freeze raw, air fryer or oven
The day before. Poach the chicken, make the filling and refrigerate it with the broth. The cooked dough keeps up to 2 days in a sealed bag in the fridge, but cold dough is stiffer to shape: knead it with damp hands first. The filling keeps 1 to 2 days.
Freeze them raw, breaded. Freeze on a parchment-lined tray, not touching, for 2 to 3 hours until hard, then bag them. They keep up to 3 months. Don’t freeze fried coxinhas; the dough turns mushy.
Frying from frozen. No thawing. Brush off any ice crystals, lower them in gently with a slotted spoon, fry 3 or 4 at a time (frozen ones cool the oil more), and add 1 to 2 minutes. Cut one open to check the center is hot before frying the rest.
Air fryer. Preheat to 400°F (200°C), brush or spray the coxinhas with oil all over and don’t crowd the basket. About 15 minutes freshly made, 18 to 20 minutes from frozen, turning halfway. Test one first, since machines vary. The crust comes out drier, paler and less evenly brown than fried; the flavor is the same.
Oven. At 400°F (200°C) on a lined sheet, sprayed with oil, 20 to 25 minutes, turning 2 or 3 times. Even drier than the air fryer, but it works for a crowd.
Party sizes and serving
- Cocktail-size. 25 g (about 1 oz) of dough and 1 tsp filling: about 40. They fry faster; pull them as soon as they’re golden.
- Bakery-size. 90 g (about 3 oz) of dough and 2 tbsp filling: 12. Fry at about 345°F (175°C) so the middle heats before the crust darkens.
- 48 or more. Make two batches of dough rather than one double batch. With 1.5 liters of broth, stirring hard enough in a home pot gets very difficult. The chicken and filling can be doubled in one go.
Serving. Warm, on their own or with ketchup, mayonnaise, hot sauce or a pink salsa rosada. On a snack table they sit well next to Brazilian cheese bread and Venezuelan tequeños. If you like fried dough with a filling sealed inside, Colombian stuffed potatoes and cassava carimañolas are shaped the same way, with the outer layer wrapped around the filling.
Leftovers. Refrigerate within 2 hours in a sealed container, up to 3 days. Reheat in the oven or air fryer at 350°F (180°C) for 5 to 8 minutes, until hot to the center. The microwave heats them but softens the crust.
Coxinha FAQ
Is a coxinha the same as a croquette? It’s a close relative, built the other way round. Cuban ham croquettes are ground ham bound in a very thick béchamel. In a coxinha the dough and the filling are separate layers, and the dough is made with broth instead of milk.
Can I use self-rising flour? Use all-purpose (UK plain) flour. Self-rising flour has baking powder and salt the dough doesn’t need, and changes its texture.
Can I shape them in the morning and fry at night? I’d freeze them raw instead and fry from frozen. If you want to keep things in the fridge, store the dough and filling separately and shape when you’re ready.
How many per person? This batch makes 24: two each as a snack, three or four if they’re dinner.
Nutrition per serving
Calculated from the recipe quantities, allowing about 5 g of absorbed oil per coxinha, for a serving of 2 medium coxinhas:
- Calories: 410 kcal
- Protein: 18 g
- Carbohydrates: 35 g
- Fat: 22 g, of which 5 g saturated
- Fiber: 2 g
- Sugars: 2 g
- Sodium: 421 mg
One fried coxinha is about 205 kcal. Air-fried with just a light spray of oil, a serving comes to around 330 kcal, because the frying oil accounts for roughly 88 kcal of it. Bouillon cubes push the sodium up considerably.
I make mine with thighs almost every time, because the filling stays juicier. I shape all 24, fry half and freeze the rest raw, so there’s a snack ready another day without washing the dough pot again. For dipping, salsa rosada works well, just as it does with stuffed potatoes. Josnaisis.