
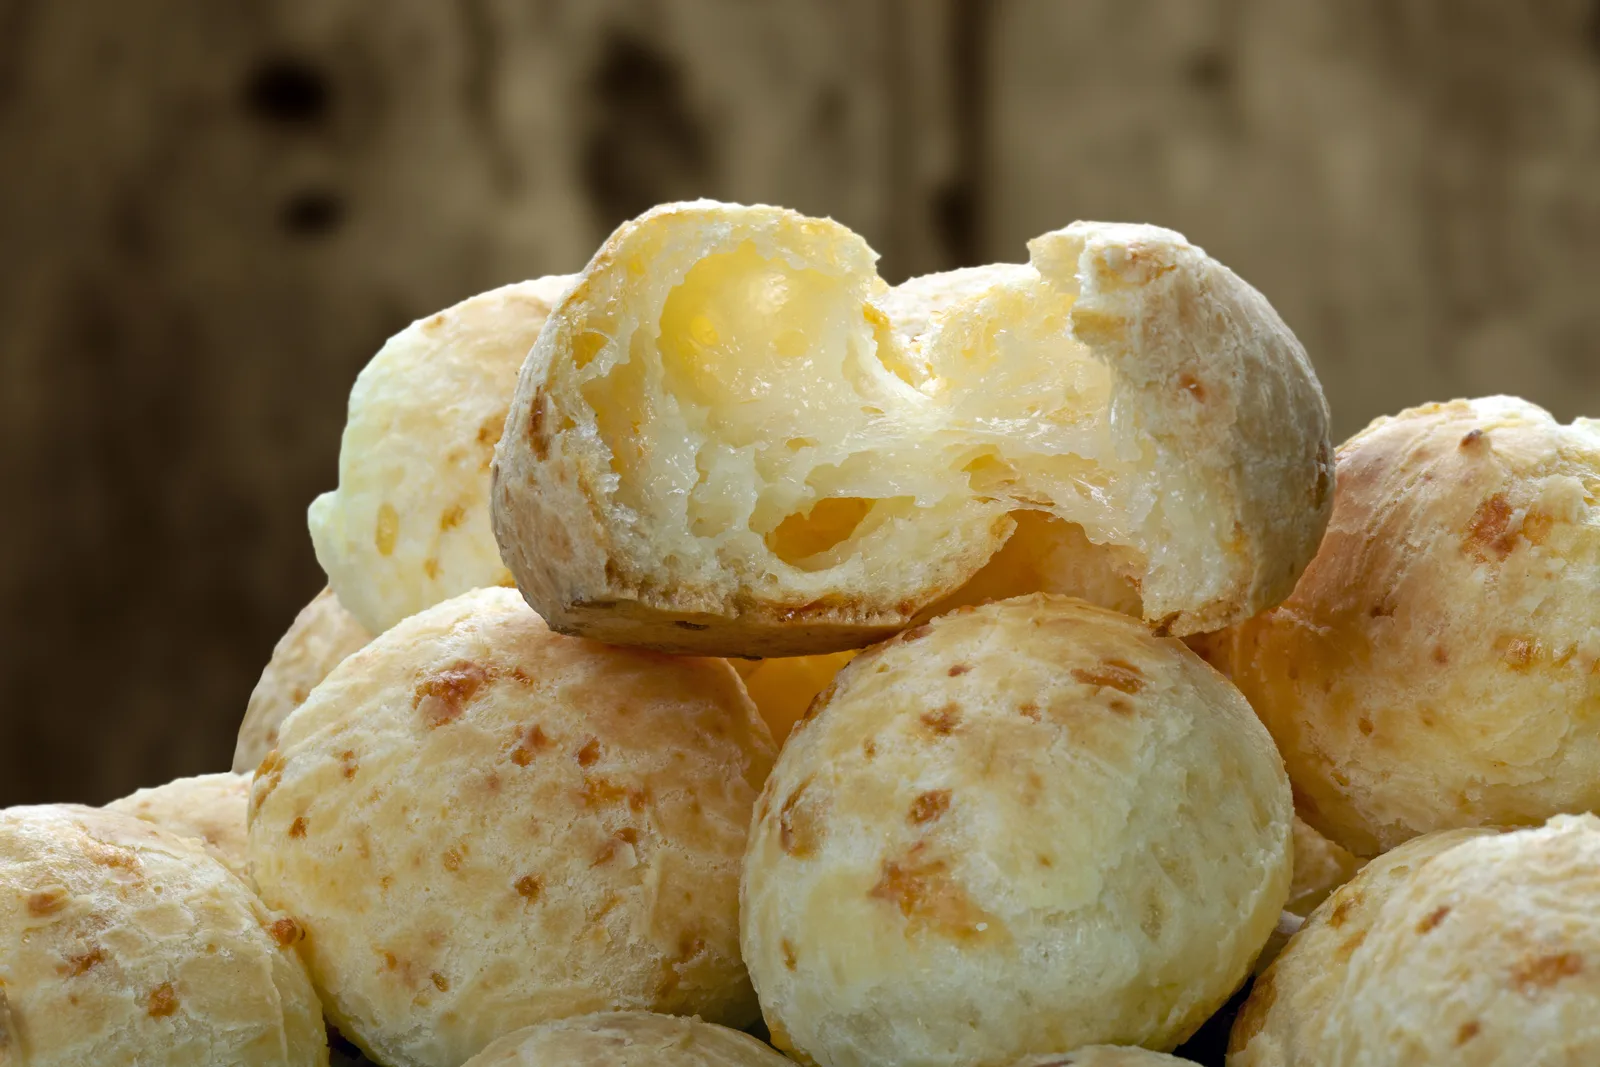
Pão de queijo (pown-jee-KAY-zhoo) is the small cheese roll of Minas Gerais in Brazil, and it has no wheat and no yeast in it. Steam does the lifting. The trick is scalding the cassava starch with boiling milk and oil before the eggs and cheese go in, which partly cooks it and gives you that hollow, chewy middle inside a crisp shell. Below is a 26-roll batch made with a mix of sour and sweet tapioca starch, what those two bags actually are, where to find them in the US and UK, which supermarket cheese gets you closest, and how to freeze the dough balls so you can bake a handful any morning.
What pão de queijo is, and how long it takes
How do you make Brazilian cheese bread? Bring ¾ cup (180 ml) of milk and ¼ cup (60 ml) of oil to a boil and pour it over 7 oz (200 g) of sour cassava starch, 3½ oz (100 g) of tapioca flour and 1 tsp of salt. Once the dough is warm, knead in 6¼ oz (180 g) of grated cheese and 2 eggs, roll 1 oz (30 g) balls and bake at 400°F (200°C) for 25 to 30 minutes, until puffed and golden. 70 minutes for 26 rolls.
In Brazil they’re breakfast or afternoon snack food, eaten warm with coffee. They taste of aged cheese with a faint tang from the sour starch, and they’re best within an hour of baking.
Total time 70 minutes: about 40 to scald, cool and shape, 30 in the oven. Easy. The only real work is kneading a sticky dough; the things to watch are the milk temperature and the oven.
It’s naturally gluten-free: cassava starch, cheese, milk and eggs. If you’re baking for someone with celiac disease, buy starch labeled gluten-free, because it can be packed alongside wheat, and keep the sheets and parchment clean of wheat crumbs. It contains milk and eggs.
How it differs from other cassava cheese breads
Colombia has close relatives, and the bags of starch overlap, so it’s worth knowing which is which.
- Pão de queijo uses sour plus sweet starch, scalded, with a little more than half as much cheese as starch (180 g to 300 g). Hollow inside.
- Colombian pandebono uses sour starch only, unscalded, with a little cornstarch and much more cheese (in our recipe, twice as much cheese as sour starch). Moister and denser, baked hotter, at 425 to 445°F.
- Colombian almojábanas have no cassava starch at all: precooked cornmeal and fresh curd cheese, soft and cakey.
- Colombian pandeyuca uses plain tapioca starch with baking powder and bakes into crisp, dry rings.
Ingredients and US or UK swaps
| Ingredient | Metric | US | Notes |
|---|---|---|---|
| Sour cassava starch (polvilho azedo) | 200 g | 7 oz, about 2 cups | Brazilian or Latin grocery, or online |
| Tapioca flour or starch | 100 g | 3½ oz, about ¾ cup + 1 tbsp | Any supermarket baking or gluten-free aisle |
| Whole milk | 180 ml | ¾ cup | |
| Neutral oil | 60 ml | ¼ cup | Olive oil tastes too strong here |
| Large eggs | 2 | 2 | Room temperature |
| Parmesan | 120 g | 4¼ oz | Finely grated from a block |
| Low-moisture mozzarella | 60 g | 2 oz | The firm block sold for pizza |
Weigh the starch if you can. Sour starch is coarser and lighter than tapioca flour, so a cup of each weighs quite differently and cup measuring throws the dough off.
Sour or sweet starch, and what each one does
Both are cassava starch. Sour starch (polvilho azedo, “sour” in Portuguese) is fermented in tanks and sun-dried; sweet starch (polvilho doce) is simply dried, and it’s the same thing as the tapioca flour, also sold as tapioca starch, on US and UK shelves. Sour starch smells faintly tangy; sweet smells of nothing.
| Starch | What you get |
|---|---|
| Sour only | The most puff, crisp crust, hollow center, a noticeable tang. Dries out faster as it cools. |
| Tapioca flour only | Little rise, denser and chewier, almost no crust, milder, so it needs a punchy cheese |
| 2 parts sour to 1 tapioca, as written | Good puff, chewy but not gummy inside, tang in the background |
If you only have one, use 300 g (10½ oz) of it and expect the texture in the table. Don’t use cassava flour (whole ground root, not starch), cornstarch or wheat flour.
Where to buy sour cassava starch
- US. Rarely in mainstream supermarkets. Look for polvilho azedo or sour cassava starch in Brazilian and Latin groceries and online, in 1 lb (500 g) to 2 lb (1 kg) bags. Colombian shops sell the same product as almidón agrio de yuca.
- UK. Tapioca starch is easy to find in Asian supermarkets and online. Sour starch means a Brazilian shop or an online order.
Which cheese to use outside Brazil
In Minas the cheese is queijo minas meia-cura, a semi-firm, salty, slightly tangy cow’s milk cheese you won’t find at the supermarket. What matters is a cheese that’s dry and full of flavor: wet cheese makes a heavy, greasy dough that slumps.
| Cheese | What it does | How much |
|---|---|---|
| Parmesan, Grana Padano or Pecorino Romano | Big flavor and salt, very little moisture, a hollow golden roll | Can be all 180 g (6¼ oz); Pecorino is saltier, so taste the dough |
| Low-moisture mozzarella | Stretch and softness, mild flavor | Up to a third, 60 g (2 oz); on its own the dough gets heavy |
| Asiago or aged white cheddar | Sharp and melty | Swap 1 for 1 with Parmesan and taste for salt |
| Queso fresco | Mild and wet | Better avoided; if you use it, drain it well, keep it to 60 g (2 oz) and add salt |
Grate it finely and straight from the fridge: cold cheese grates loose and spreads evenly through the dough.
Make-ahead plan
- Up to 3 months ahead. Shape and freeze the balls (see below).
- The night before. Make the dough, press plastic wrap onto the surface and refrigerate up to 24 hours. Cold dough is firmer, which makes rolling easier; bake 2 to 3 minutes longer.
- On the day. Turn the oven on 15 minutes before the balls go in.
For a crowd, figure 3 or 4 rolls per person. A double batch gives about 52 and fits in a 3-quart saucepan for the scald. On a party platter they sit well next to Venezuelan tequeños, the fried cheese sticks.
Step by step
Scald. Milk and oil go to a full rolling boil, bubbles across the whole surface and climbing the sides, about 4 minutes. Pour it over the starch and salt in one go and stir. Where the hot liquid hits, the starch turns glassy and sticky; the rest stays in white lumps. That’s normal, and the lumps disappear once you knead in the eggs. If the milk was only hot, not boiling, the starch doesn’t cook and the rolls rise less.
Cool. Wait 10 to 15 minutes, until the dough is warm and you can knead it bare-handed. Eggs added to hot dough scramble into strands and the cheese melts early.
Cheese, then eggs. Knead in the cheese first. Then the egg in three goes, 1 to 2 minutes of kneading each time.
Getting the dough texture right
It’s ready when it’s smooth, soft and a little tacky, like damp modeling clay.
- Cracks when you roll a ball, or feels stiff. Too dry. Work in milk 1 tbsp at a time, or a little more beaten egg.
- Too sticky to shape, or the balls spread on the sheet. Too wet. Knead in tapioca flour 1 tbsp at a time, or cover the dough and chill it 30 minutes to firm up.
- Test. Roll one ball and leave it on the counter for 1 minute. It should still be round.
Shaping and baking
Oil your hands, roll 1 oz (30 g) balls and space them 1½ in (4 cm) apart; they grow. The oven must be fully at 400°F (200°C) when they go in, because the steam that puffs them forms in the first minutes. I keep the door shut for the first 15 minutes: a roll that hasn’t set yet sinks when cold air rushes in. With two sheets, I swap them between racks at 20 minutes, once they’ve puffed, so they brown evenly.
How to tell they’re done. At 25 to 30 minutes they’re puffed, golden on top and on the bottom, and feel light. Break one open: if the center is raw and pasty, give them 3 or 4 more minutes. In a convection oven, start checking at 20 minutes.
Why it came out flat, gummy or deflated
- Flat and dense. Oven not fully preheated or below 400°F, or milk that never boiled.
- Spread at the sides. Dough too wet, or too much fresh cheese or mozzarella. Fix it with tapioca flour before shaping.
- Gummy inside. Underbaked, or mostly tapioca flour. Wait until the bottoms are golden too.
- Hard and dry. Overbaked, or eaten cold the next day. Reheat them as below.
- Puffed, then collapsed. Too much liquid or pulled too early. A few more minutes sets them.
- Strands of cooked egg. The egg went into hot dough.
- Too sour. All sour starch with a mild cheese. Use the 2 to 1 mix or a sharper cheese.
Blender batter and air fryer versions
Blender pão de queijo, no scalding. This is the shortcut version many US recipes use. Blend 2 eggs, ½ cup (120 ml) milk and ¼ cup (60 ml) oil for 5 seconds, add 1 cup (120 g) tapioca flour, about 3½ oz (100 g) grated cheese and ½ tsp salt, and blend about 10 seconds, scraping the jar, just until smooth. It’s a pourable batter: fill a greased 24-cup mini muffin tin three-quarters full and bake at 400°F (200°C) for 15 to 18 minutes. Twenty-five minutes, no kneading, but it’s a different roll: muffin-shaped, softer and moister, without the scalded version’s hollow center, and it may sink a little as it cools.
Air fryer. Works best with frozen balls: 350°F (180°C) for about 10 minutes, in one layer with space between them, turning halfway. Air fryers vary a lot, so check the first batch at 8 minutes.
Freezing and baking from frozen
- Set the shaped balls close together, not touching, on a parchment-lined sheet.
- Freeze until hard, then move them to a well-sealed freezer bag. They keep up to 3 months.
- Bake straight from the freezer, no thawing, at 350°F (180°C) for about 30 minutes, until golden. Don’t go lower than 350°F or they bake up hard.
Baked leftovers. Refrigerate in a sealed container within 2 hours; they keep 3 to 4 days, and baked rolls can be frozen too. Reheat at 350°F (175 to 180°C) for 5 to 10 minutes, from frozen if they were frozen, until the crust crisps again.
Cost. The cheese is what makes this pricey; the starch is cheap. A block of domestic Parmesan-style cheese costs much less than imported Parmigiano-Reggiano and works fine here.
Pão de queijo FAQ
Are tapioca flour and tapioca starch the same thing? Yes. In the US and UK both names are used for the same fine, unfermented cassava starch, the Brazilian polvilho doce, so a bag with either name works for the 100 g (3½ oz) here. Sour starch is a different product.
Why is my pão de queijo hollow inside? It’s meant to be. Steam inflates the ball and the sour starch stretches around it and sets. A solid, dense roll usually means the oven wasn’t hot enough or the starch was all tapioca flour.
Can I make it without eggs? Eggs bring color, flavor and stretch. I don’t have a tested egg-free ratio, so I’d rather not suggest one.
Can I use cassava flour instead? No. Cassava flour is the whole root dried and ground, with fiber in it, and it doesn’t scald or puff like starch.
Nutrition per roll
Per 1 oz (30 g) roll, with Parmesan and mozzarella, worked out ingredient by ingredient:
- Calories: 97 kcal
- Protein: 3 g
- Carbohydrates: 11 g
- Fat: 5 g, of which 2 g saturated
- Sugars: 1 g
- Sodium: 183 mg
Almost all the carbohydrate is starch; the cheese brings most of the fat and sodium. Three rolls, a usual breakfast serving, come to about 290 kcal.
I came to pão de queijo through the bag of sour starch I already kept for pandebono, and the first lesson was that the two recipes don’t swap: the scald changes everything. These days I bake a double batch on a Sunday, freeze most of it in bags of fifteen, and pull out what we need while the oven heats. Dylan wants his with Parmesan only; I like a bit of mozzarella in mine for the stretch. Josnaisis.